Table of Contents
- What Is Wakeboarding?
- Getting Prepared
- Getting Started on Your Wakeboard
- Maneuvering and Controlling Your Board
- Surface Tricks
- Basic Jumps and Lifts
- Advanced Jumps and Flips
- Building Your Strength and Stamina
- Wakeboarding Gear
- Where to Wakeboard
- Precautions to Take While Wakeboarding
What Is Wakeboarding?
Wakeboarding is a surface water sport, involving three essential elements – a board, a rope, and a boat. The rider stands on a small board, usually rectangular with curved tips, with in-built shoe-shaped bindings, and is towed by a boat with the help of a rope. This rope is short enough for the rider to ride the wake or trail behind the boat and use it to guide their movements and perform jumps and tricks.
The shoe-like bindings on the board, along with the momentum of the wake, allow the rider to achieve greater heights in their jumps and perform more complex tricks, making it an ideal activity for those who are already comfortable with water sports and are looking for a more challenging experience. At the same time, it’s also a great water sport for beginners, as it can be done across a varying range of complexity or simplicity. Its simple form without the tricks can usually be picked up fairly quickly, and may be easier for first-timers than riding on a board without the shoe bindings.
In fact, its flexible range along with its encouragement of free-styling is itself an important feature of wakeboarding, adding another layer of possibilities and excitement!
Wakeboarding is a relatively young sport, and first emerged in the late eighties as an amalgamation of several other sports including surfing, water skiing and snowboarding.
Besides being a recreational activity, it is also played widely in the international competitive arena. The International Waterski and Wakeboard Federation (IWWF), which was recognized by the International Olympic Committee as a partner as early as 1967, is the official platform for competitive wakeboarding. Since 2005, wakeboarding has been included in the World Games, a multi-sport event that takes place every four years, and includes those sports that are widely played in the international arena yet are not included in the Olympic Games. It even made it to the shortlist of sports being considered for the 2020 Tokyo Olympics, but was not successful in its campaign.
In the present day, wakeboarding continues to be one of the fastest growing surface water sports. Its popularity has spread widely and rapidly, and there are over 3 million wakeboarders across the world.
Getting Started on Your Wakeboard
If you are wakeboarding for the first time, you may want to hire an instructor for your first few sessions, but if you are relatively comfortable around water and watersports, you can easily try wakeboarding on your own.
First, strap or lace up your wakeboard bindings so they fit you snugly and make sure you are comfortable with whichever foot you’re placing forward. Standing with your right foot forward is a regular stance, while keeping your left foot forward is called a goofy stance. If you are uncomfortable with the stance the bindings are placing you in, unfasten and readjust them before continuing.
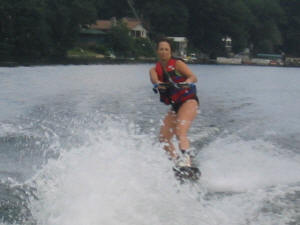
Position yourself at some distance from the boat, but not so far that the rope is already pulled straight. Let your wakeboard lie sideways, half submerged under water, and get into a squatting position with your knees close to your chest. Keep your arms straight in front of you on either side of your knees and grip the handle of the tow rope.
Make sure the boat accelerates very gradually, particularly if you are just starting out. Once the tow rope is pulled tight and the boat starts towing you forward, don’t try and stand up too quickly. Instead, stay low in your squatting position, and your board will automatically swing forward and you will be pulled into a semi-upright position. Only then should you straighten up and stand, but continue to keep your knees slightly bent. Remember to lean backwards away from the boat, as the tension this creates keeps your balance and allows you to control the board.
Let the boat move at a relatively slow speed, and let all accelerations and decelerations be gradual. Despite this, it’s likely that you’ll fall in the water a few times before getting the hang of it, but don’t get discouraged – it’s all part of the fun! Since all your gear – board, helmet, life vest and tow rope – are made of buoyant material, getting up after falling should be relatively easy.
Quick Tip: If you’re having trouble getting started, you may want to consider using a slightly shorter rope as this can help in keeping you upright once you’re standing. Once you’re comfortable staying up and can ride without falling over, switch to a regular rope and adjust your speed to go faster.
It takes plenty of strength just riding behind the boat staying at the surface, so it may take some time for your muscles to get used to it, but pretty soon you’ll find your balance. Like a riding a bike, wakeboarding is something you never forget once you get the hang of it, and the exhilaration of the experience will be well worth the initial effort!
Maneuvering and Controlling Your Board
Once you’re comfortable riding the wake of the boat at a relatively fast pace, there are plenty of ways to amp up your experience and have an even more exciting ride, but before you learn any impressive looking moves, it’s important to spend some time just learning how to maneuver and control your board.
Edging
The most basic technique you will need to learn for this is edging, which involves shifting your weight forward or back on your board and using the pressure on its sides or edges to steer and maneuver yourself. Leaning backwards away from the boat while putting your weight on your heels means using the heel-side edge, while going over on the balls of your feet and shifting your weight forward allows you to use the toe-side edge. Depending on your stance, using the heel-side and toe-side edges of your board are what make you go left or right rather than simply getting towed in a straight line behind the boat.
Whether you are starting or stopping to edge, or you’re switching from a toe-side to heel-side edge, avoiding letting your movements get too sharp, and keep things fluid and gradual.
Quick Tip: Do not attempt to steer your board by turning it. This is ineffective and will hamper your balance! Stick to edging when trying to go left or right.
Crossing the Wake
You can use the edges of your board to cross the wake – which moves outwards in both directions from the back of the boat – going from one side of it to the other. This is a good way to practice your toe-side and heel-side edging, and also helps you get comfortable with the feel of the wake and the way it affects the balance and movement of your board. It’s also fun and challenging without being too complicated, and so is a good task to set yourself as a relative beginner.
While crossing the wake, practice carving the water by using a deep and hard edge, quickly and fluidly alternating between your heel-side and toe-side edges. This will help you cross the wake repeatedly and seamlessly without pausing at each end, and also create a big spray of water if you push deep into the edge at the point when you reach the wake.
Switch Stance
This basically means wakeboarding while keeping the opposite foot forward than the one you normally would. In other words, if you normally use a regular stance, your switch stance would be the goofy stance, and vice versa. This is good practice for tricks you may learn that involve turning and spinning.
Surface Tricks
Now that you’re able to control your board and maneuver yourself on the water, try some basic tricks and turns on the surface of the water. These will add some challenge to your ride, give you goals to work towards, and keep improving your technique before attempting more advanced tricks!
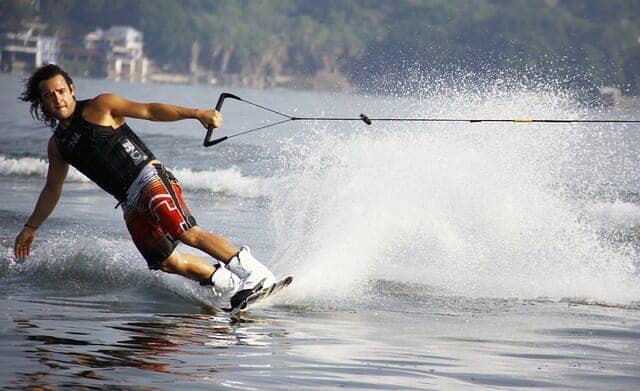
One-Hand Grip
Try releasing the handle of the tow rope and maintaining your grip with only one hand. Make sure to keep your knees bent and upper body leaning away from the boat as you do this to avoid falling face-first! Gradually try edging your board and increasing the amount of time you’re able to maintain this grip and wakeboard naturally. This is not only a fun trick allowing you to wave to your friends on the boat or shore, but it will also help your confidence with tricks where you may need to switch hands in between or release one hand to get into a flip.
Surface 180
Attempt to spin your board on the surface of the water so your front and back feet swap positions. Use your back foot to initiate the spin rather than leading with your front foot. You may find this easier to do if you begin in your switch stance and spin into your usual stance, but practice it both ways, and do a complete trick by first spinning 180 degrees in one direction, and then back again. When you spin while turning your chest towards the boat, it is called a front-side spin, while turning away from backwards from the boat is called a back-side spin. Keep your weight centered as you spin and try keeping things smooth without any jerky movements.
Surface 360
Once you’ve mastered the 180 spin, attempt to do a complete 360 spin, ending up in the same position you started. Doing this basically involves putting together a back-side and front-side 180 spin, while passing the tow rope from one hand to the other in between. Check out the video below to learn the proper technique of doing a surface 360.
Sideslide
A sideslide means spinning your board 90 degrees and holding the position so you ride with your feet pointing straight ahead and directly below your shoulders rather than sideways with one foot in front of the other. Stay on your heel-side edge to keep your balance against the pull of the rope and avoid falling forwards.
Basic Jumps and Lifts
Once you’re comfortable on the water and have mastered some basic surface moves, it’s time to try a few jumps. Jumps and aerial tricks form a large part of the appeal of wakeboarding, but patience is key here. While it’s possible to get the hang of jumps fairly quickly, it’s likely that you’ll fall a fair amount before being able to lift off and land smoothly. Start small, and try mastering these basic jumps before moving on to bigger tricks.
Ollie
This is a straightforward jump which can be used to move forward, clear a wake, or jump over an obstacle in the water. It is also the basis for more advanced aerial tricks, so it’s worth spending some time getting comfortable with it.
To do an ollie, first shift your weight to your back foot. Next, lift your front foot while simultaneously leaning into the heel-side edge of the board with your back foot. At this point, you may want to let go off the tow rope handle with your back hand in order to maintain the position of your board. Bring your back foot level with your front to get your board in a horizontal position and reach the full height of your jump!
Quick Tip: For every jump you attempt, prepare for your landing even as you take off. Focusing on a single spot will help keep your balance as you land. Avoid tilting the nose of your board downwards as you descend, and remember to keep your knees bent.
Ollie 180
Once you’ve mastered ollies, try combining them with front-side and back-side surface 180s and spin your board while in the air. Unlike with regular ollies, keep gripping the handle with both hands when adding the spin.
Progressive Heel-side Edge
Progressive edging involves edging increasingly and accelerating as you approach the wake so you are at your fastest when you come into contact with it, and so have maximum momentum to go into a jump. Start by learning a progressive heel-side edge, as it’s generally easier to learn than progressive toe-side edging.
Begin this move about 10 to 15 feet away from the wake at your heel-side. As you are naturally pulled in closer to the wake by the boat, put pressure on the heel-side of your board, and keep increasing this pressure to build the edge as your get closer and closer. When you reach the top of the wake, straighten up slightly and make sure your tow line is held tight. If your edge has been strong enough and the line has enough tension to it, your board should get a good pop as you reach the top of the wake and lift you into a quick jump.
Progressive Toe-side Edge
A progressive toe-side edge is similar to its heel-side counterpart in many ways, but the experience of actually doing it can feel very different, and involves some subtle differences.
Begin 10 to 15 feet away from the wake at your toe-side, and keep increasing the pressure on the toe-side edge of your board as you get closer to the wake. This time, however, stand taller and straighter than you normally would, and hold the tow rope closer to your hips to build the line tension. Continue increasing your edge and therefore your speed as you approach the top of the wake, which should give your board a strong pop. Rather than attempting an ollie or any other jump, let the wake do the work and lift your board naturally.
Quick Tip: In order to perfect your progressive toe-side edge, you may find your regular toe-side edging needs some work. Practice these drills to get comfortable boarding with your toe-side, and your progressive edge should become much easier to master.
Wake Jumps
Once you’re comfortable with progressive edging, use the approach to actively lift off your board as you reach the top of the wake for higher and longer jumps. The stronger your edge and the faster you are as you hit the wake, the more momentum and height you’ll get. After getting a good amount of height and distance to your jumps, you can attempt wake to wake jumps, which involve lifting off from the top of one wake, and landing beyond the opposite one.
Advanced Jumps and Flips
With the combination of a strong, consistent wake and secure shoe-bindings on your board, wakeboarding is particularly conducive to high jumps and flips. These may seem daunting at first but if you’re confident with your board control and smaller jumps, it’s possible to learn these fairly quickly and move into a whole new dimension of wakeboarding!
Back Roll
Though it may seem more challenging mentally, a back flip is physically easier to do than a front flip, which makes the back roll a great choice for your first flip.
The back roll is essentially a backwards cartwheel-style rotation you launch into after hitting the wake with a hard, progressive edge. It can be done using the toe-side or the heel-side edge, though the latter is generally easier to start with. As you hit the wake, stand a little straighter and lift off into a high jump, using the pop the wake provides to rotate yourself. Once you’re in the air and inverted, bring in your knees a little closer to your chest, spot your landing point, and prepare to land with the tail of your board hitting the water first.
Watch the video below for an idea of what a smooth back roll looks like and how to achieve it:
Quick Tip: If flips are entirely new to you, you may want to get comfortable with the idea of being inverted by practicing them on a trampoline before attempting them on your wakeboard.
Front Roll
A front roll is essentially the same trick as the back roll, but with a forward cartwheel instead rather than a backwards one. Unlike the back roll, it is easier to attempt a toe-side front roll as this will give you more leverage as you hit the wake to rotate.
Tantrum
This is one of the most popular wakeboard tricks, and is a kind of back flip also known as a ‘trip flip’. As you would for a back roll, approach the wake with a progressively harder and faster edge. As you get close though, about a meter and a half away from the wake, straighten up completely and come off the edge to ride flat on your board. Release the handle from your back hand, ride through the wake keeping your shoulders parallel to the wake (turn away from the boat slightly) and use the pop to jump and begin your flip. Before you take off, make sure you’re completely off the edge of your board, as the wake ‘tripping’ your flat board is what makes a tantrum what it is.
As you become inverted, bring your knees in closer to your chest, and swing into your back flip. Spot your landing point and make sure your knees stay bent to absorb the impact of your tantrum as you complete one of the most iconic wakeboard tricks!
Watch the clip below to see what a tantrum should look like:
Front Flip
The front flip is a more advanced version of the front roll, and though it involves progressively edging up to the wake, the actual flip is done not over the edge of the board but over its tip.
The approach to a front flip is similar to that of a heel-side front or back roll, and involves progressively edging in closer to the wake, but requires you to keep more weight on your back foot and let off the edge slightly – not completely – as you are at the closest point. As you hit the wake, roll your weight forward onto your front foot while straightening out your back leg. Simultaneously, launch yourself into a jump while throwing your head on shoulders forwards towards the nose of your board to build maximum momentum for your flip. Your board should lift tip-first and rotate so it is directly over your head.
As you spot your landing and prepare to hit the surface, you may want to release the handle from your back hand to maintain your balance.
Whirlybird
This trick is one of the harder ones to master, and when done correctly, it’s also one of the most graceful and impressive-looking ones! Make sure you’re comfortable with jumps, flips and rolls before attempting it.
A whirlybird looks like a twist and a back flip in the air, and basically combines the tantrum with another move called the back-side 360. Begin your approach the same way as you would for a tantrum, but with a harder edge before straightening up your stance close to the wake. Also shift your weight more onto your front foot.
As you lift off, straighten upwards further, then turn your body a little so that your back is closer to the boat. Release the handle from your back hand, and build momentum by throwing your arms, shoulders and head away from the boat. Unlike a tantrum, a whirlybird requires you to twist away from the boat as you launch up, and so almost gives the illusion of a double flip. Continue to twist as you become inverted, spot your landing, and swing your legs over, keeping your knees bent. The whirlybird may take a fair amount of work before you’re able to pull it off, and practicing the move on the trampoline may help you speed it up. Watch the video below to see what a whirlybird should look like:
There are countless tricks you can learn on your wakeboard, and the more you practice, the smoother and higher you’ll be able to go.
Besides spending time on the water, you can also improve your wakeboarding skills by staying fit and following various workout routines.
Building Your Strength and Stamina
While you do not need to be in perfect shape before you start wakeboarding, you may find yourself less able to control the board or tiring too quickly if your strength and endurance are not at their peak. While wakeboarding itself has plenty of physical and mental health benefits, and will eventually make you stronger and fitter, there are several things you can do to speed up the process that will help you become a better wakeboarder.
Wakeboarding is a full-body workout and utilizes multiple muscle groups, but the core is probably the most important of these, as it keeps you balanced on the board and in the air, and gives you strength while pulling the rope and leaning into you board. Your legs – and the knees in particular – are another important focus area, as you need them to be strong and sturdy while staying put on your wakeboard and for controlling your board and your body during jumps. Your chest, back and arms also do a lot of work gripping and controlling the tow rope and keeping your body balanced.
There are several exercises you can do to strengthen the muscles you need for wakeboarding. You can do these a few times a week to see an improvement in your performance, and continue to practice them in the off season or during your time away from wakeboarding to stay in shape for when you return.
Doing a combination of these exercises for an hour a day about 5 days in a week, can give you great results. Remember that while cardio and core exercises can be done daily, your arms, legs, chest and back muscles should be given a day or two to recover before you focus on them again.
- Cardio Workout: 20-30 minutes of cardiovascular exercise like brisk walking, running, cycling, jumping rope, or swimming can help hugely in improving your overall fitness, toning your muscles, and increasing your stamina .
- Rowing Machine: If you have access to one of these, using it can help you work on all the muscle groups used during wakeboarding in one go – your core, arms, legs, and back. It also an intense cardio workout and burns calories rapidly. Using a rowing machine for 30 minutes every alternate day can help greatly with overall fitness and keeping your muscles strong for wakeboarding.
- Two-leg Bridge: Lie on your back with your knees bent, hip-width apart, slowly lift your hips up until a clear diagonal is formed by your knees, hips and chest. Hold your hips up for 2 counts, and repeat up to 30 times. This will help increase you core strength and stability.
- Plank Position: Begin by lying on your stomach while keeping your elbows directly below your shoulders, and your forearms on the floor. You can clasp your hands for additional support while lifting your hips to align your body in a straight plank-like position. Hold this for up to 8 counts and repeat up to 15 times to strengthen your core.
- Squats: Do up to 50 squats for stronger legs and an engaged core. Be careful about keeping your knees directly above your feet and not letting them bend further ahead.
- Lunges: Do 25 lunges on each side for stronger legs, glutes, and core.
- Pull-ups: Grip a bar with your palms facing away from your body and pull yourself up until your chin is above the level of the bar, then lower yourself back down at a controlled pace. Do up to 10 of these for a complete work out of your shoulders, arms, chest, back and core, and for an improved grip. A pull-up itself is a fairly hard exercise, and if you’re unable to do one, there are several alternatives that provide the same benefits as pushups and also help build your strength up to the point where you can do one.
- Weight Training: Working out your muscles while gripping weights will not only increase your strength but also improve your grip significantly. Work on one muscle group at a time, and remember not to work out the same group while weight training on consecutive days. A variety of weight training exercises exist for each muscle group, utilizing different equipment including dumbbells, barbells, exercise bands and more. Don’t neglect your legs while weight training, as your knees and thighs do a lot of work staying balanced in position, maneuvering your board, and jumping and landing as you wakeboard.
These exercises can be performed in different combinations each day, and you can gradually increase the number of repetitions or intensity of each set to continue challenging yourself. Once you have worked up your strength and stamina to a good level, you may want to work on exercise plans developed especially for wakeboarders. Alternatively, develop your own combinations based on your requirements and focus areas.
Quick Tip: Do not stick to the same routine every day, particularly one that you are able to complete easily. It’s important that you feel challenged by your workouts, and a little soreness the day after just shows that your workout has been effective.
All About Your Wakeboarding Gear
Whether you’re picking up wakeboarding on your own or practicing with an instructor, it’s important to know about all the different equipment required for wakeboarding, and to know how to pick equipment that’s right for you. Wakeboarding with an unsuitable board, wrong boat or insufficient safety equipment could result in an experience that is not only uncomfortable, but also potentially dangerous.
Choose a wakeboard that’s comfortable, is the right size for you and is appropriate for your skill level. Wakeboards are available in various shapes and sizes, from those which provide greater control and stability for beginners as well as those which allow for greater freedom and easier jumps for advanced riders. Plenty of information and tips are available to help you decide which combination of features best suits your needs, and how to choose the best board for yourself .
Make sure your tow rope is designed specifically for wakeboarding and not for any other sport (like waterskiing). A wakeboarding tow rope is specially made with plastic fibers with minimal stretch, and is usually between 60 to 70 feet long.
In terms of the boat that’s towing you, the two things to look out for are that it creates a strong wake, and that its tow point is not too low. A low tow point will angle the rope in such a way that you will be pulled down quickly after jumps and aerial tricks, so look for a tow point that is about 7 feet above the surface of the water. Watch the video below to learn the proper method of fastening your tow rope to the boat:
A. The Board
While other pieces of equipment may be rented or borrowed, it’s best to use your own wakeboard based on your own individual requirements. There are a number of things to consider before investing in one, so make sure you do your research beforehand and get one that’s a perfect match!
The most basic point to consider is the size of the board, which largely depends on the weight of the rider. An adult weighing up to 130 lbs would require a board around 130 centimeters long. For each additional 10 lbs, 2 centimeters should be added to the length of the board. Wakeboards for children weighing up to 95 lbs begin at around 119 cm, and a similar formula can be applied to calculate the length of the wakeboard based on the increase in weight of the rider. The width of a basic wakeboard is generally between 38 and 44 centimeters.
The next thing to keep an eye out for is the shape. A board with squared edges generally allows for a greater degree of control as compared to one with rounded edges. A single-tipped board has one squared side (the back, or the tail) and one rounded, more pointed side (the nose), and is ideal for beginners who are likely to wakeboard in one direction in the water without performing complicated tricks. A double-tipped board on the other hand has a pointed tail as well as nose, and allows for more dexterity in the water, and for easier changes in directions. While this makes it slightly harder to control, it also means it is ideal for advanced wakeboarders capable of jumps and tricks.
The ideal rocker – or the curvature of the bottom – for a board is another feature that depends on the intended use of the board. A high rocker has a more rounded bottom, and allows wakeboarders to land more smoothly after jumps as compared to a lower rocker which has a flatter bottom and is generally easier to control while riding and accelerating in a straight line. Additionally, rockers may be continuous or three-staged. A continuous rocker is shaped like a smooth curve with no sharp angles, and is generally easy to control, but has more drag, is slightly slower in the water and requires more effort and skill to take off if high jumps are performed. A three-staged rocker on the other hand is more angular and is made up of three distinct lines instead of a smooth curve. It is faster than a continuous rocker, and its angles allow for sharper and higher jumps, making it more suitable for advanced wakeboarders.
Wakeboards often use fins at the bottom, which act as grips that control the flow of water under the board. Usually, you can find one fin at each end of the board, but boards with fins of different numbers (as many as six!) and configurations (central or to the sides) are also easily available. Fins placed closer to the center release more easily from the wake, and are therefore better for jumps and tricks as compared to fins placed closer to the tip and tail.
Deeper and wider fins offer more stability and control but make the board slightly slower and less conducive to tricks as compared to shallow, narrow fins. Some advanced wakeboarders even prefer riding finless, which provides the most freedom and dexterity, but demands a much higher skill level. Riders who go finless use the very edges or the rails of the board for control. While some boards come with built in or molded fins, others allow you to use removable fins and play around with configurations to find one that works best for you.
A variety of shoe-bindings are available for wakeboards. The most common are basic open-toed boots, which are completely adjustable and so can be used by different people with different foot-sizes. More customized and well-fitting closed boots can also be found with contoured soles and better support, but these are generally more expensive and harder to get in and out off. Hinge-style boots may provide a solution to this problem, as they have hinges at the heel, which can open easily to allow the foot in or out. Shoe-bindings may come with a range of different features in terms of their closures (laces, straps, Velcro, hinges), their height (ankle length or taller boots strapping in the lower part of your shins), and their fit.
Before fastening the bindings on your wakeboard, you need to know what stance you will take while riding. Riding with your right foot forward is a regular stance while keeping your left foot forward is called a goofy stance. Fastening the bindings to your wakeboard is a fairly straightforward process, but you may need to make some adjustments to make sure they allow you to ride in a stance you are absolutely comfortable with.
Watch the video below to get an idea of how to fasten your bindings to your board:
Wakeboards are usually made with fiberglass or carbon/graphite – or a combination of the two – wrapped around a core of polyurethane foam. This means they are lightweight yet also strong and sturdy. Foam cores may be substituted with wooden cores, particularly in wakeboards for advanced riders, as these allow for a sharper snap against the wake and are good for jumps and tricks.
If you’re unsure about what sort of wakeboard you need, it may be best for you to try a variety of rented boards before making your decision. Even after you have chosen a board, don’t forget to try it along with the bindings and make sure you’re completely comfortable with them – they are the foundation for having a great wakeboarding experience!
B. The Boat
A standard motorboat travelling at a speed of 16 to 25 miles per hour is usually used for wakeboarding. The primary feature to look out for is the size of the wake the boat creates. A very large wake may be harder to navigate for beginners, yet wakes that are too small or soft are also not ideal. Jet boats and outboard boats (i.e. those with motors on the outside of the hull) usually create weaker wakes and are less suited for wakeboarding. Inboard/outboard (I/O) boats that have internal motors as well as external propulsion systems, and inboard boats with only an internally contained motor are generally more popular choices for wakeboarders.
Besides the wake size, the other important feature on a board used for wakeboarding is the height of the tow point. The height of the pylon or ski eye for attaching the tow rope is usually about 7 feet above the water’s surface, which makes it easier for riders to jump and perform aerial tricks without being pulled down quickly by the angle of the rope.
If you are looking to buy a boat, you can keep an eye out for various comfort and recreational features it may contain. Besides ergonomically designed seating, you can find boats with a variety of sound and display systems, which may be of interest to you if you intend to use the boat even apart from while wakeboarding. There is plenty of information out there on boats specifically designed for wakeboarding, as well as on multipurpose boats as they fare while wakeboarding, so do make sure to do your research and read plenty of reviews before buying one, as it can be a relatively large and long term investment! Alternatively you may want to stick with renting a boat, in which case it’s still a good idea to be aware of all your options.
If you already have a boat but it isn’t designed for wakeboarding, you can find several attachments and devices that can help you create a larger wake. Ballast bags and pumps can help enhance a weaker wake and make it more suitable for wakeboarding. The pumps are used to fill up the bags with water, which then help the hull of the boat to sink lower into the surface and displace more water, thereby increasing the wake.
C. The Tow Rope
The tow rope is what connects the rider on a wakeboard to the boat, and keeps them on the wake. This rope is generally between 60 to 70 feet long – though beginners may find it easier to use shorter ones – and is made of a material with minimal stretch. The materials include plastic fibers like Dyneema, Spectra and Poly E, which are lightweight, very strong, and not stretchy at all. The ropes come with fastens or loops at one end that fix it to the boat, and a handle at the other, which allows the rider to grip the rope easily. Handles are also made with strong, light, buoyant material, and the grips are usually designed to provide maximum comfort to someone holding on for extended periods. Keep an eye out for a brightly colored tow rope, as it will be easy to find in the water in case you drop it.
D. Safety Gear
Wakeboarding, whether at an advanced or beginner level, can be a fairly intense activity. It’s important to stay safe and have all the equipment that will keep you from getting hurt.
A personal flotation device like a life jacket is an absolute essential. Even if you are a strong swimmer, these will help hugely in getting back up quickly after falling into the water from a fast-moving board, and will prevent you from sinking after a high-impact fall. Make sure your life jacket fits you snugly.
Protective headgear should also be worn while wakeboarding, particularly while performing jumps and tricks. Waterproof helmets are available for sports like wakeboarding and wakesurfing where falls may be of high impact at high speeds.
If you go wakeboarding in colder waters, you may want to consider wearing a wetsuit, which will also give you some extra buoyancy in the water. In warmer waters, board shorts or comfortable bathing suits are usually worn.
Who Can Wakeboard?
Clearly, wakeboarding is a popular activity. It is, however, considered to an extreme sport and may not be suitable for everyone. Make sure it’s right for you before you begin, to ensure your safety and comfort!
Do I need to be able to swim in order to wakeboard?
Yes, while riding a wakeboard itself does not involve swimming, and you should be wearing a life vest at all times, it is important to be a fairly confident swimmer before you wakeboard. You will be moving at a relatively fast pace and it is highly likely that you will fall into the water at some point! Comfort in the water and an ability to swim in case of falling yourself or dropping the tow rope is important for your safety.
Can children wakeboard?
Yes, children even as young as five or six can try wakeboarding if they are good swimmers. Specialized gear is available in different sizes for children, so make sure they have an appropriate board and a well-fitting life jacket. Additionally, the speed of the boat may need to be slowed down, particularly at the start of the session when the rider is being pulled into the wake.
Make sure kids are properly instructed by someone who is comfortable wakeboarding – if you yourself are not, you may want to approach a professional instructor – before they wakeboard for the first time. Watch the video below for some tips on how to get them started!
Is wakeboarding safe for people with health conditions and pregnant women?
In general, it is not advisable for pregnant women to wakeboard, as it can be a fairly strenuous exercise and is likely to involve falls.
If your health condition is mild, wakeboarding may be suitable for you, but do consult a doctor before trying it. You don’t necessarily need to be perfectly fit in order to wakeboard. In fact, wakeboarding is associated with several physical and mental health benefits that can help your overall fitness level significantly!
Where to Wakeboard
Unlike sports like surfing, wakeboarding requires relatively calm waters. Natural currents and waves can be quite disruptive and make for a very choppy, and even potentially dangerous ride. This means that while it is possible to wakeboard in any large water body, calm lakes are generally the most popular, safe and convenient spots.
While the lake need not be very wide – about 600 feet is usually enough – in order to wakeboard in it, its length should ideally have a clear stretch of at least 1 mile. The depth of the lake should be at least 10 feet, as this is not only required for creating a good wake, but also for safety reasons. If you have a high impact fall into a very shallow lake after a jump, you run the risk of hitting the floor and causing yourself serious injury.
Make sure the lake does not have other water sports or swimmers present at the same time. Not only can it be cumbersome to watch out for other vessels, but a collision can cause serious damage and injury. If it is a very large lake and others are present, do make sure you coordinate beforehand and predefine your routes.
If you’re serious about water sports and are planning your next vacation around it, plenty of information is available on the best places in the world for wakeboarding. Alternatively, you can look for suitable lakes near you as well as wakeboarding and watersports parks that have created dedicated spaces for these activities.
Precautions to Take While Wakeboarding
Staying safe while wakeboarding should always be a priority, and there are several precautions you can take to make sure you have a good experience in the water.
- Make sure you are a confident swimmer before you wakeboard.
- Don’t forget your life jacket and your helmet even if you are a confident swimmer and or advanced wakeboarder.
- Check that all your gear is in good working condition. The boat should be running smoothly, the bindings on your wakeboard should be intact and well fastened to the board, and the tow rope should have minimal fraying and be free of knots.
- Make sure your location is sufficiently large and free of crowds.
- Even in calm waters, check the weather beforehand. Avoid wakeboarding if there are strong winds or lightning storms.
- Always ensure that there is at least one other person in the boat besides the driver. If you fall into the water while riding or if any other problem occurs, it may be difficult for the driver to notice. The second person – the spotter – in the boat should be the one to keep an eye on you while you wakeboard and ensure that the driver stops in time whenever the need arises.
- Ensure that you, the driver of the boat, and the spotter are on the same page about all precautions as well as things like speed, route, and stopping/restarting after falls before you begin wakeboarding.
- Keep an eye on the boat while you wakeboard. This will help your balance as well as allow you to react quickly in case of any unexpected moves.
- There are some basic hand signals you should learn in order to communicate with the driver and spotter in the boat. Extending your left or right hand out indicates the direction you want the boat to take, thumbs up and thumbs down signals are used to indicate that you want the boat to speed up or slow down respectively, and raising your hand with your palm facing out means ‘stop’.
- Ensure that the engine of the boat is switched off before it approaches a wakeboarder – whether they have fallen in or require any other assistance.
- Wear waterproof sunscreen.
- Make sure you are properly hydrated. Wakeboarding gives your muscles a good workout, and staying hydrated reduces the chance of cramps.
An important part of staying safe and having an enjoyable ride is simply staying relaxed. If at any point you feel uncomfortable, stop, readjust and refocus, and start again. While the different technicalities of the process and big jumps and tricks may seem daunting, your wakeboarding experience can be whatever you choose to make of it, so go at your own pace, but don’t be afraid to challenge yourself. Remember that wakeboarding is done more for the freedom it allows than for any rules it prescribes.
What Makes Wakeboarding Different from Surfing, Wakesurfing, Waterskiing and Kneeboarding?
Though the differences between a number of surface water sports may seem subtle, these can be instrumental in making the experience of the sport what it is. This is particularly true for wakeboarding, which developed as a result of modifications and developments made to older sports.
Surfing, for example, is one of the predecessors to wakeboarding. While it also involves riders standing on a board and riding waves, the waves in question are natural ones rather than trails created by boats, and the board is of a more elongated shape without the shoe bindings.
Surfing also developed into wakesurfing, where the rider rides a wake created by a boat, but continues to use a surfboard rather than a wakeboard. Additionally, wakesurfers tend to let go of the tow rope after the boat pulls them into the wake.
Waterskiing involves the rider wearing two separate skis on each foot rather than standing on a board. As with wakesurfing and wakeboarding, waterskiing requires the rider to hold on to a rope and be towed by a boat, but the boat in question is usually a towboat that creates a very small wake, as skiers need the water’s surface to be relatively flat and calm.
Kneeboarding uses a similar boat and wake as the ones required for wakeboarding, but as the name suggests, the rider kneels down while riding rather than standing, and is strapped onto the board at the thighs. Kneeboarders, despite being in a seated position, can also perform a variety of jumps and tricks while riding.
Wakeboarding itself can include several variations, and sometimes, these may have distinct names of their own, but there is a common history and basic technique associated with wakeboarding that distinguishes it from other sports while unifying its variations under one umbrella.
More on Wakeboarding
Though surface water sports and tow sports have been around a long time, wakeboarding is fairly young sport. It first emerged in the late eighties as an amalgamation of several other sports including surfing, water skiing and snowboarding.
In the late seventies and early eighties, surfers in the absence of natural waves began using tow ropes and boats – as water skiers did – to create substitutes, and used these to continue their sport even in calm waters. In this way, the sport known as ‘skurfing’ came about. Though it was American surfer Tony Finn who, after collaborations with Allan Byrne from New Zealand and Jeff Darby from Australia, first produced the official branded ‘Skurfer’ board in the mid-eighties, similar products had been in use in different parts of the world even a few years prior. Notably, Bruce Mckee and Mitchell Ross developed the ‘Mcski’ in Australia, which later came to be sold under different brand names including the SSS Skiboard, the Wakesnake, and the Surf-Ski.
These products all fell under the category of skurfboards, which were shorter versions of surfboards designed to be ridden on the wakes of boats rather than on natural waves. With Tony Finn’s Skurfer, the product developed to include straps to fasten the rider’s feet to the board, and it became a forerunner to the wakeboard.
As the skurfboard evolved in shape and size to become more distinguishable from both the surfboard as well as from skis, it eventually gave birth to a new sport altogether. The name of the new sport – wakeboarding – was coined by Paul Fraser from Vancouver, Canada, along with his brother Murray.
The popularity of wakeboarding grew rapidly, and the World Skiboard Association founded in 1989 by Jimmy Redmon very soon changed its area of focus and therefore its name, becoming the World Wakeboard Association.
Wakeboarding received a further boost when Paul Fraser approached American sportsman and professional ski board producer Herb O’Brien, who launched the Hyperlite wakeboard in the early nineties. The Hyperlite was the first of its kind to have neutral buoyancy, meaning that its density was similar to that of water and it could float on the surface, making it more convenient for riders to get back on their feet in case they fell. Additionally, it was manufactured using a compression-molding method, which revolutionized the production of the product across the world over the following years. Compression-molded boards, while made using the same basic material as older boards – i.e. foam, resin, and fibreglass – were inevitably more rigid than others, and retained their stiffness over a longer period of time.
Whether you aim to wakeboard competitively or plan to stay with it purely for recreation and entertainment, there are many dimensions of the sport you can explore, and countless ways to make it your own!